Seed Saving Guide
Written by David Rodgers — Updated March 2026
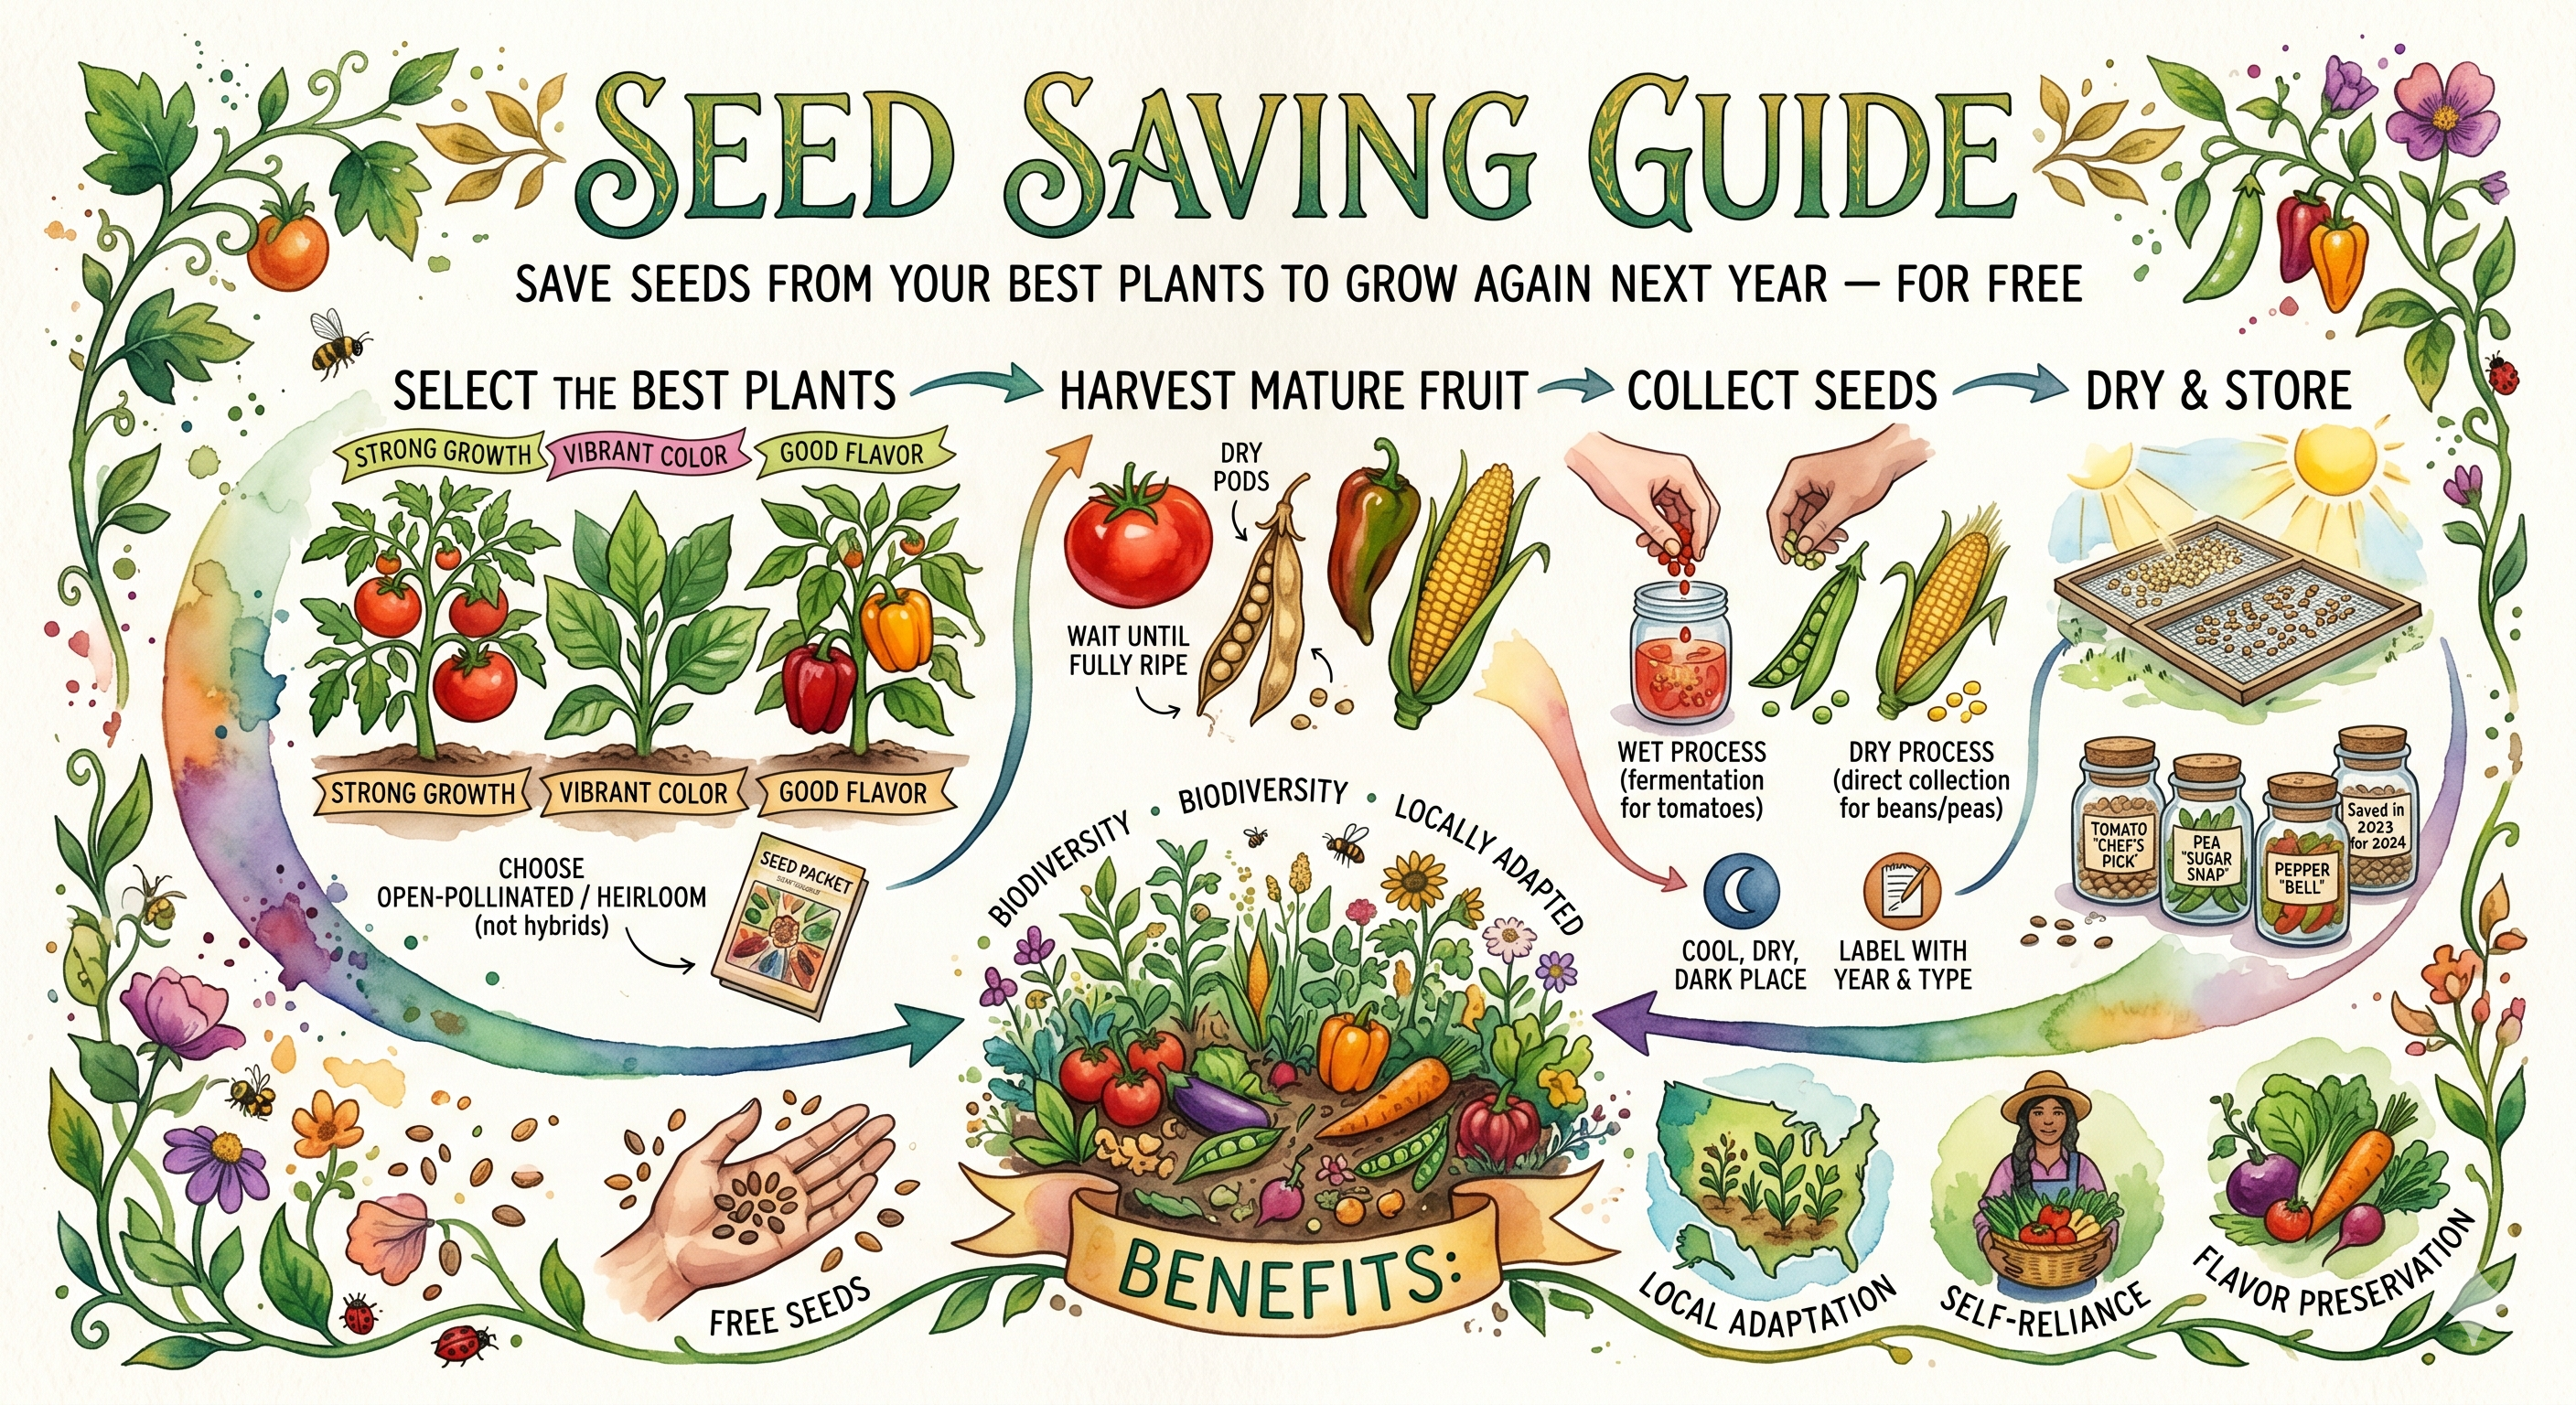
Save Seeds from Your Best Plants to Grow Again Next Year — for Free
Saving seeds is one of the oldest human skills — practiced for ten thousand years before the first garden center opened. When you save seed from your best tomato, your most prolific bean, your most beautiful flower, you are doing something that every gardening ancestor did as a matter of course: selecting for your own soil, your own climate, your own taste. Over time, saved seeds become locally adapted strains tuned to exactly your conditions. This guide gives you everything you need: the science of pollination and seed maturity, detailed instructions for 50+ vegetables, herbs, and flowers, the storage conditions that keep seeds viable for years, and the selection principles that let you improve your garden with every passing season — all for the cost of a few paper envelopes and a permanent marker.
Section 1: Why Save Seeds
The Six Core Benefits of Saving Your Own Seeds
| Benefit | What It Means in Practice |
|---|---|
| Cost savings | A packet of 25 tomato seeds costs $4-6. A single saved tomato contains 150-300 seeds. One season's seed saving from a single plant funds dozens of future seasons. A fully self-sufficient seed-saving garden has essentially zero annual seed cost beyond the initial variety acquisition. |
| Local adaptation | Seeds saved from plants that thrived in your specific soil, microclimate, and regional conditions gradually develop genetic tuning to exactly those conditions. Over 3-5 generations of selection, locally saved seeds reliably outperform the same variety grown from commercial stock in your specific garden — because they have been selected for it. |
| Variety preservation | Thousands of heirloom and open-pollinated varieties have been lost as commercial production standardized around a narrow range of marketable types. Home seed savers are the primary keepers of rare and heritage varieties. Every gardener who saves seed from an unusual variety is performing a conservation act. |
| Food sovereignty | Control over your own seed supply is control over your food supply. In a system where commercial seed availability depends on global logistics, corporate decisions, and annual purchasing, the seed-saving gardener is genuinely self-sufficient in a way that a non-saving gardener is not. |
| Selection for your tastes | Commercial varieties are selected for yield, shelf life, and shipping durability — not for flavor. When you save from your most delicious tomato or your most fragrant flower, you are running a selection program tuned to exactly what you value, not what a supermarket buyer values. |
| Connection to plant heritage | Seed saving connects you to the generations of gardeners who selected and preserved the varieties you grow. Growing 'Cherokee Purple' tomato from saved seed is participating in a continuous lineage of seed keepers. Many seed saving gardeners describe this as one of the most meaningful aspects of growing food. |
Open-Pollinated vs. Hybrid vs. GMO: What You Can and Cannot Save
| Seed Type | What It Means | Can You Save? |
|---|---|---|
| Open-Pollinated (OP) | Pollinated by insects, wind, or self-pollination in traditional patterns; offspring reliably resemble parents when properly isolated | YES — this is the foundation of seed saving. Includes all heirlooms. Will breed true within reasonable isolation distances. The backbone of the seed saving garden. |
| Heirloom | A subset of open-pollinated varieties with documented history, typically pre-1950 and passed down through generations | YES — same as OP. Often have exceptional flavor, unique appearance, and cultural heritage. All heirlooms are open-pollinated; not all open-pollinated varieties are heirlooms. |
| F1 Hybrid (marked 'F1') | First-generation cross between two stabilized parent lines; bred for uniformity and often hybrid vigor; offspring are genetically unpredictable | NOT RECOMMENDED — offspring will not breed true. Plants from F1 seed are vigorous, but saved seeds produce highly variable offspring. |
| GMO | Contains genes inserted via recombinant DNA technology, typically for herbicide or pest resistance | Legally complicated; practically irrelevant for home gardeners. GMO varieties are not sold to home gardeners at retail. |
| Treated seed | Commercially treated with fungicides, pesticides, or other compounds; or physically processed for germination | YES for seed saving — treatment only affects the stored seed, not the plant's genetics. Plants grown from treated seed produce completely normal, savable seeds. |
Look for OP or Heirloom: When buying seeds with the intention of saving them, look for packets marked "Open-Pollinated," "OP," "Heirloom," or "Heritage." Avoid any packet marked "F1 Hybrid" or simply "Hybrid." Reputable seed companies specializing in OP and heirloom varieties include Seed Savers Exchange, Baker Creek Heirloom Seeds, Southern Exposure Seed Exchange, and High Mowing Organic Seeds.
The Seed Saving Learning Curve: Easy to Expert
| Difficulty Level | Crops | What Makes Them This Difficulty |
|---|---|---|
| Beginner — Start Here | Tomatoes, beans, peas, lettuce, peppers, annual herbs (basil, dill, cilantro) | Self-pollinating crops that rarely cross; seeds ripen at or shortly after edible maturity; no or minimal isolation required; simple processing |
| Intermediate | Squash, cucumbers, melons, corn, annual flowers (zinnias, marigolds, sunflowers), annual herbs (chamomile) | Primarily insect-pollinated; require isolation distance or bagging; seeds need full ripening beyond edible stage; moderate processing |
| Advanced | Brassicas (cabbage, broccoli, kale, etc.), beets, spinach, carrots, parsnips, onions, most flowers | Biennials (must overwinter); wind-pollinated crops with large isolation requirements; highly cross-compatible species; more complex processing and longer timelines |
| Expert | Developing new varieties; working with F2 hybrids; large-scale isolation of multiple varieties simultaneously | Deep understanding of plant genetics, population size requirements, systematic selection across multiple generations, and dedicated isolation infrastructure |
Section 2: The Science of Seeds
Understanding Pollination: The Foundation of Seed Saving
| Pollination Type | How It Works | Seed Saving Implication | Examples |
|---|---|---|---|
| Self-pollination | Pollen from a flower's own anthers fertilizes its own ovule; occurs before or during flower opening; insects rarely interfere | Seeds will breed true to parent variety; little or no isolation required; easiest category for seed saving | Tomatoes, peppers, eggplant, beans, peas, lettuce, most annual herbs |
| Insect cross-pollination | Requires insects (primarily bees) to carry pollen between flowers; different varieties of the same species will cross if insects can reach them | Isolation distance or physical exclusion (bagging, caging) required between varieties of the same species to maintain variety purity | Squash, cucumbers, melons, brassicas, sunflowers, most flowers, many herbs |
| Wind cross-pollination | Pollen is light, produced in large quantities, and carried by wind; can travel very long distances | Largest isolation distances required — up to a mile for some wind-pollinated crops; population size also matters for genetic health | Corn, beets, spinach, chard, brassicas (also insect-pollinated), many grasses |
| Mixed: perfect flowers with insect backup | Flowers contain both male and female parts; can self-pollinate but insects also visit and can introduce pollen from other plants | Some crossing occurs; degree of isolation needed depends on how much crossing matters for the crop | Some tomato varieties; certain cucumbers; many flowers |
Isolation: Keeping Varieties Pure
Isolation is the practice of preventing cross-pollination between different varieties of the same species. There are two main methods: distance isolation and mechanical isolation (bagging, caging, or row covers).
| Isolation Method | How It Works | Best For | Practical Notes |
|---|---|---|---|
| Distance isolation | Planting different varieties far enough apart that natural pollinator movement or wind does not carry pollen between them | Large gardens; rural gardens surrounded by non-related crops | Distance requirements vary enormously by crop. Neighbors' gardens count. |
| Bag isolation (individual flower) | Lightweight breathable bags (paper or row cover fabric) placed over individual flowers before they open; removed after self-pollination | Tomatoes, peppers; high-certainty purity; crossing controlled varieties to develop new types | Mark bagged branches with flagging tape. Not plastic (traps heat and moisture). |
| Cage isolation | A frame covered with fine insect mesh placed over individual plants or small groups; allows air and light but excludes insects | Brassicas; squash; any insect-pollinated crop where you need purity from a single plant or small group | Install before flowers open. Hand-pollination inside the cage is needed for crops that require insects to set seed. |
| Temporal isolation (staggered planting) | Planting different varieties so they flower at different times — one completes flowering before the other begins | Crops with defined bloom windows; useful for corn, squash | Effective only when flowering windows do not overlap. Weather can shift timing unpredictably. Use as a supplemental method. |
| Population isolation (alternate day caging) | Alternate between caging two groups on alternate days, hand-transferring pollen within the same variety while excluding crosses | Maintaining outbreeding crops (brassicas, corn) with multiple individuals needed for genetic health | More complex; used by experienced seed savers. Essential for maintaining vigor in obligate outbreeders. |
Seed Maturity: The Most Important Concept in Seed Saving
The single most common seed saving mistake is harvesting seeds too early. Seeds continue developing long after the fruit or vegetable reaches edible maturity — and seeds harvested before physiological maturity will have poor germination rates, reduced vigor, and shorter storage life.
| Maturity Stage | What Is Happening in the Seed |
|---|---|
| Edible maturity | The fruit or pod is at peak eating quality. The seeds inside are often still developing. Germination rates from seeds at this stage are often only 30-60% at best. |
| Full physiological maturity | Seeds have completed their development and reached maximum dry weight. The seed coat has hardened and sealed. The seed has entered a dormant state with full food reserves. Germination rates are typically 80-95%+. |
| Over-ripeness (wet-fruited crops) | In tomatoes, squash, and cucumbers, leaving fruits past edible maturity on the plant actually helps seeds reach full maturity. Slightly shriveled, fully colored fruits contain better seeds than perfect eating specimens. |
| Pod shatter (dry-seeded crops) | Beans, peas, and other dry-seeded crops continue to ripen and dry on the plant until the pods brown and begin to split. Seeds at this stage have maximum germination energy. |
The Fully Ripe Rule: When in doubt, leave it longer. Seeds from fully ripened, slightly over-mature fruits consistently outperform seeds harvested at peak edible quality. For tomatoes: leave the best seed fruits on the plant until they are fully soft and slightly past ideal eating.
Selection: How to Choose Which Plants to Save From
Seed saving without deliberate selection is just reproduction. Seed saving with selection is improvement. Over 3-5 generations, the cumulative effect of consistent selection becomes measurable — the variety becomes tuned to your specific conditions.
| Trait Category | What to Select For | What to Cull (Never Save From) |
|---|---|---|
| Vigor and health | Strong early germination and establishment; robust growth throughout the season; resistance to local pest and disease pressure; recovery from stress | Slow or uneven germination; weak or spindly growth; first plants to show disease; plants that never recover from drought or pest pressure |
| Timing and adaptation | Plants that mature in your season length; that set fruit in your heat or cold; that flower and fruit within the expected window for the variety | First plants to bolt (especially in lettuce, spinach, brassicas — early bolting passes that tendency to offspring); plants that fail to ripen before frost |
| Yield and productivity | Plants with the highest yield of the trait you value; greatest number of fruits, pods, or seeds; continuous production over longest season | Low-yielding plants even if individual quality is good — select for both quality and quantity |
| Flavor, texture, and quality | Best eating quality by your own assessment; characteristic flavor of the variety; ideal texture for your purpose; correct color and form for the variety | Off-type fruits that do not represent the variety's characteristic traits; unusual size, color, or shape (unless deliberately selecting for change); bitter, bland, or poor-tasting specimens |
| Trueness to type | Plants whose fruits, pods, or flowers exactly match the variety description; correct size, shape, color, and flavor; no indication of crossing | Any plant showing characteristics of a different variety (suggests accidental crossing); plants producing off-type fruits |
Minimum Population Size: Why You Need Multiple Plants
For self-pollinating crops, a single plant can maintain a variety's genetics reasonably well — though saving from 3-6 plants is better practice. For cross-pollinating crops, minimum population size is critical to maintaining genetic diversity and preventing inbreeding depression.
| Crop Type | Minimum Recommended Plants for Seed Saving |
|---|---|
| Self-pollinating annuals (tomatoes, peppers, beans, peas) | Minimum 1 plant; recommended 3-6 for greater genetic diversity and hedging against plant loss |
| Insect-pollinated annuals (squash, cucumbers, melons) | Minimum 3-6 plants of the same variety; 6-12 preferred to maintain variety health across generations |
| Wind-pollinated crops (corn, beets, spinach, chard) | Minimum 6 plants; 20-50 strongly recommended, especially for corn; small populations lead to inbreeding depression within a few generations |
| Biennials (carrots, parsnips, onions, brassicas) | Minimum 6 plants that overwintered and reflowered; 12-20 recommended for maintaining variety health |
| Outbreeding perennials and complex crops | Consult specialist resources; some crops require populations of 50-200+ to maintain long-term genetic health |
Section 3: Crop-by-Crop Seed Saving Guide
The Tomato Family — Easiest Seed Saving
Tomatoes are the perfect starting crop for seed saving. They are self-pollinating (pollen rarely transfers between plants), their seeds are clearly visible in the fruit, and the wet processing method — though it requires a few days — is simple and highly effective.
| Crop | Isolation Needed | When to Harvest for Seed | Processing Method | Step-by-Step Notes |
|---|---|---|---|---|
| Tomatoes (all types) | 25 ft for home savers; 150-300 ft for true purity | Fruit fully ripe, soft, slightly past peak eating quality — the seed fruits should be the best-flavored representatives of the variety | Wet fermentation | 1. Squeeze or scoop seeds and gel into a jar. 2. Add equal volume of water. 3. Leave at room temperature 2-3 days, stirring daily — a mold layer forms on top; this breaks down the germination-inhibiting gel coat. 4. Add water, swirl; viable seeds sink, debris floats. 5. Pour off debris and floating seeds. 6. Rinse clean seeds in a fine strainer. 7. Spread on a ceramic plate or glass — NOT paper towels. 8. Dry in a warm place 1-2 weeks until seeds snap apart and do not dent when pressed. Label immediately. |
| Peppers (sweet & hot) | 300-1500 ft (can cross between sweet and hot; hot/ornamental types cross freely) | Fully ripe pepper — fully colored (red, orange, yellow, purple depending on variety); well past the green eating stage; slightly shriveled is fine | Dry processing | 1. Allow peppers to reach full ripe color on the plant — do not save from green peppers. 2. Cut open and scrape seeds from the central placenta. 3. Spread on a plate in a single layer. 4. Dry in a warm, well-ventilated spot for 1-2 weeks. 5. Seeds are ready when they are hard and snap when bent. Wear gloves when handling hot pepper seeds — capsaicin is concentrated. |
| Eggplant / Aubergine | 150-300 ft | Leave selected fruits on plant far past eating stage — fruits turn brown, yellow, or spotted and become hard and seedy | Dry or minimal wet processing | 1. Allow fruit to fully ripen past edible stage on the plant. 2. Cut open and scrape seeds. 3. Rinse briefly if seeds are in gel. 4. Spread on a plate and dry 1-2 weeks. Some gardeners ferment briefly (1 day) as with tomatoes — either method works. Seeds are ready when they are hard and off-white to cream colored. |
The Legume Family — Beans, Peas, and More
Legumes are among the easiest seeds to save. They are self-pollinating, and the seeds dry right on the plant in their pods. The main challenge is timing the harvest before pods shatter and seeds are lost.
| Crop | Isolation Needed | When to Harvest for Seed | Processing Method | Step-by-Step Notes |
|---|---|---|---|---|
| Beans (bush and pole) | 15-25 ft (occasionally visited by bees but mostly self-pollinating) | Pods fully brown and papery; seeds rattle inside; pods beginning to split — harvest before they shatter completely | Dry on plant, then cure | 1. Stop harvesting eating beans from selected plants early in the season — let pods develop fully. Mark seed plants with flagging tape. 2. When pods are fully brown, pull entire plants or harvest pods individually. 3. Spread in a warm, dry place for 2-4 weeks to cure completely. 4. Thresh by rolling pods between hands or by putting in a pillowcase and trampling gently. 5. Winnow to separate seeds from chaff. 6. Store in airtight containers. |
| Peas | 15-25 ft | Pods fully tan and papery; seeds hard inside; pods beginning to dry down from the top | Dry on plant, then cure | 1. Mark selected plants at the start of the season — choose the most vigorous with the best pod set. 2. Do not harvest eating peas from marked plants. 3. When pods are fully papery brown, harvest and spread to cure in a warm dry place for 2-3 weeks. 4. Shell when fully dry. 5. Peas are large and easy to process by hand. Test for dryness: peas should be rock-hard and snap if bitten. |
| Runner beans | 25-50 ft (more bumblebee-visited than other beans) | Pods fully papery and brown; the large seeds are visible through the pod walls | Dry on plant, then cure | 1. Leave selected pods to mature fully — pods become brown and start to twist and curl. 2. Harvest before first frost as runner beans are not frost-tolerant. 3. In wet autumns, harvest entire plants and hang upside down in a shed to finish drying. 4. Shell when fully dry. Seeds are mottled and distinctive — easy to identify. |
| Broad beans (fava beans) | 3-5 ft minimum; highly self-pollinating but occasional crossing | Pods fully black and papery; seeds inside hard and dried | Dry on plant or indoors | 1. Leave a few plants unharvested for seed — mark in advance. 2. Pods turn black and papery when seeds are mature. 3. In wet conditions, harvest plants when pods are half-turned and finish drying indoors hanging upside down. 4. Shell when fully dry. Seeds are large and easy to process. |
| Soybeans / Edamame | 10-15 ft | Pods fully dry and tan-colored; leaves have fallen from plant | Dry on plant | 1. Leave selected plants unharvested as edamame — let pods develop and dry fully on the plant. 2. Harvest when all pods are tan and leaves have dropped naturally. 3. Thresh and winnow as with beans. Small batch processing by hand is easy. |
The Cucurbit Family — Squash, Cucumbers, Melons
Cucurbits require more attention than legumes because they cross-pollinate freely via bees. Different varieties of the same species will cross if grown without isolation, producing unpredictable offspring. However, different species (e.g., butternut squash and zucchini) do NOT cross — they belong to different species even though they look related.
The Cucurbit Species Key: You can grow zucchini (C. pepo) and butternut (C. moschata) and Hubbard (C. maxima) in the same garden without isolation — they will not cross because they are different species. The problem only occurs when you grow two varieties of the SAME species together. Grow just one variety per species per season and you need no isolation at all.
| Crop (Species) | Isolation Distance | When to Harvest for Seed | Processing | Species & Crossing Notes |
|---|---|---|---|---|
| Summer squash & zucchini (C. pepo) | 500-1500 ft from other C. pepo varieties | Leave fruits on plant until they are completely hard, fully colored, and the stem begins to dry — far past eating stage; typically 6-8 weeks after edible maturity | Scrape seeds from mature fruit; wash; dry | C. pepo includes: zucchini, pattypan, acorn squash, delicata, most pumpkins, spaghetti squash. All will cross with each other. Will NOT cross with butternut (C. moschata) or Hubbard types (C. maxima). |
| Winter squash — butternut type (C. moschata) | 500-1500 ft from other C. moschata | Butternut already left on vine to full ripeness for eating; for seed, allow several more weeks; skin hardens fully, stem dries | Cut open; scoop seeds; wash in water; dry on screen | C. moschata includes: butternut squash, 'Long Island Cheese' pumpkin, some Seminole squashes. Does NOT cross with C. pepo or C. maxima. |
| Winter squash — Hubbard & Kabocha (C. maxima) | 500-1500 ft from other C. maxima | After eating-stage ripeness; store for 4-6 weeks after harvest before extracting seeds — post-harvest ripening improves seed viability | Scoop; wash; dry on screen for 2-3 weeks | C. maxima includes: Hubbard, Kabocha, Jarrahdale, Atlantic Giant, some pumpkins, Buttercup. Does NOT cross with C. pepo or C. moschata. |
| Cucumbers (Cucumis sativus) | 500-1000 ft from other cucumber varieties | Leave selected cucumbers on plant until fully yellow-orange and soft — completely past eating stage; takes 5-6 weeks past eating maturity | Cut; scrape seeds and surrounding gel; ferment 1-2 days as with tomatoes; rinse; dry | Cucumbers do not cross with squash, melons, or gourds — these are all different species. They only cross with other cucumber varieties (including lemon cucumber, Armenian cucumber). |
| Melons (Cucumis melo) | 500-1000 ft from other melon varieties | Fully ripe melon — slip from vine naturally; fully sweet; for seed saving, allow additional week beyond eating ripeness if possible | Scoop seeds and gel; rinse or ferment briefly; dry on screen | Melons cross with each other but NOT with cucumbers or squash. Honeydew, cantaloupe, casaba, and watermelon are different species groupings within melons — consult species tables if growing multiple types. |
| Watermelon (Citrullus lanatus) | 500-1000 ft from other watermelon varieties | Fully ripe watermelon — dull skin, yellow ground spot, hollow thump, dried tendril nearest fruit | Scoop seeds; rinse; dry on screen | Watermelon does not cross with other cucurbits. Only crosses with other watermelon varieties. Triploid (seedless) watermelons cannot produce viable saved seed. |
Corn — A Special Case
Corn is wind-pollinated and one of the most cross-promiscuous crops in the garden. Its pollen can travel a mile on the wind. Growing corn for seed saving requires significant planning, large populations, and either extensive distance isolation or temporal isolation.
- •Isolation requirement: 1,000-1,500 feet from other corn varieties for reliable purity; temporal isolation (14+ days between tasseling dates) as an alternative.
- •Minimum population: Grow at least 50 plants — ideally 100-200 — to maintain genetic health. Small corn populations decline rapidly through inbreeding depression.
- •Harvest timing: Leave ears on stalk until husks are fully brown and papery; pull husks back and hang ears in a warm, dry, ventilated location for 4-8 more weeks.
- •Processing: Shell dried kernels from the cob by hand or by rubbing ears together. Remove the 10-15 tip kernels and 10-15 butt kernels — these are less well-developed; save from the middle of the ear.
- •Selection: Choose ears that fully filled, with straight rows, from plants that tasseled in the middle of the population's tasseling window — not the earliest or latest.
Salad Crops — Lettuce, Chicory, and Endive
| Crop | Isolation Needed | When to Harvest | Detailed Notes |
|---|---|---|---|
| Lettuce | 25 ft between varieties (self-pollinating; very occasional crossing) | When seed stalks are fully elongated; individual flowers have dried to white fluffy heads; seeds visible in dried flowerheads | 1. Mark best plants early in the season — those that bolt LAST are your seed stock (early-bolters pass that tendency to offspring). 2. Allow marked plants to bolt and flower fully. 3. Seeds mature unevenly across the flower stalk; check daily when seeds begin to ripen — shake a seed head over your hand to check. 4. Harvest entire stalks when 50-70% of seed heads are dry; finish drying in paper bags hung upside down. 5. Flail (shake or beat) dried stalks in a bag to release seeds. 6. Screen through progressively finer mesh to clean. Lettuce seeds store 4-6 years. |
| Endive / Chicory | 500-1000 ft (crosses within genus Cichorium) | When seed stalks fully dry; blue flowers have long gone; small seeds visible in dried flowerheads | Similar to lettuce. Allow to fully dry on plant; harvest before seeds shatter. Chicory crosses freely between varieties and with wild chicory — a significant isolation challenge in areas where wild chicory grows in roadsides. |
Root Vegetables — Biennial Crops
Carrots, parsnips, beets, turnips, and most root vegetables are biennials — they grow vegetative roots in their first year and produce seed only in their second year. In most of the U.S., this means overwintering the selected roots either in the ground (in mild climates) or in root cellar storage (in cold climates), then replanting in spring for seed production.
| Crop | Isolation Distance | Overwinter Method | When to Harvest | Key Notes |
|---|---|---|---|---|
| Carrots | 1000-1500 ft from other carrot varieties AND wild Queen Anne's lace (Daucus carota — same species) | Zones 6+: mulch heavily and leave in ground. Zones 3-5: dig best roots in autumn, store in damp sand in root cellar above freezing; replant in spring | When seed umbels are fully brown and dry; harvest before seeds shatter; cut umbels and dry further in paper bags | Wild Queen Anne's lace crosses freely with cultivated carrots — this is the biggest isolation challenge. Check roadsides. Minimum 12-20 plants. Select for best root shape, color, and flavor at autumn harvest before storing for seed. |
| Parsnips | 500-1000 ft from other parsnips | Extremely cold-hardy; leave in ground through winter in all but coldest zones; the freeze actually improves flavor; dig in spring | Same as carrots — dry seed umbels; harvest before shattering | Parsnip sap can cause photodermatitis (skin burns in sunlight) — wear gloves and long sleeves when handling seed plants. Very large plants in Year 2; allow 18-24 inches between plants. |
| Beets and Swiss Chard | 1-3 miles (wind-pollinated; also crosses between beets and chard — they are the same species) | Zones 6+: mulch well, leave in ground. Zones 3-5: dig and store as with carrots. Select for best root quality. | Seed stalks fully brown; seeds rattle; cut stalks and dry in paper bags 2-4 weeks | Beet and chard are Beta vulgaris — they cross freely. One variety per season or very large isolation. Minimum 6 plants; 20 preferred. Very challenging in most home gardens due to isolation requirements. |
| Turnips & Rutabaga | 1500-3000 ft from other turnip/rutabaga/brassica relatives | Zones 6+: mulch and overwinter in ground. Zones 3-5: store in root cellar as with beets. Very cold-hardy. | Seed pods fully dry, tan, and beginning to shatter; harvest entire stalks | Cross freely within Brassica rapa (turnip) and B. napus (rutabaga). Also cross with other brassica species — see brassica section. Advanced crop due to isolation complexity. |
Brassica Family — Advanced Seed Saving
The brassica family (Brassicaceae) is one of the most complex for seed saving because of the extraordinary number of crops that are the same or closely related species — and that cross-pollinate freely. Understanding which species crosses with which is essential before attempting brassica seed saving.
| Species | Crops in This Species (all cross with each other) | Isolation Notes |
|---|---|---|
| Brassica oleracea | Cabbage, broccoli, cauliflower, Brussels sprouts, kohlrabi, kale, collards, romanesco — ALL cross freely with each other | Require 1000-2000 ft isolation from other B. oleracea varieties; all are biennial (bolt second year); need overwintering of selected plants; most are insect-pollinated; populations of 6-12 minimum |
| Brassica rapa | Turnips, napa/Chinese cabbage, pak choi, mizuna, tatsoi, komatsuna, hakurei — ALL cross with each other | 1000-2000 ft from other B. rapa varieties. B. rapa crops bolt quickly and flower in the first year — an advantage for seed saving relative to B. oleracea which must overwinter. |
| Brassica napus | Rutabaga, some canola/rapeseed, Siberian kale — cross with each other | 1000-2000 ft from other B. napus; some crossing risk with B. rapa in dense plantings — separate by species as well as variety. |
| Raphanus sativus | All radishes cross with each other; do NOT cross with other brassica genera | 500-1000 ft from other radish varieties. Radishes are very easy biennial (or fast annual) seed producers — they flower and seed quickly and prolifically. Excellent beginning biennial seed saving crop. |
| Eruca vesicaria (arugula) | Arugula — all varieties cross with each other; does NOT cross with other brassica genera | 150-300 ft from other arugula varieties. Arugula bolts quickly, produces abundant seed, and is very easy to save. Excellent beginner brassica-family crop for seed saving. |
Annual Herbs — Among the Easiest Seeds to Save
| Herb | Isolation Needed | When to Harvest | Complete Method |
|---|---|---|---|
| Basil | 150-300 ft from other basil varieties | When flower spikes are fully dry and brown; seeds are small and black in dried calyxes | 1. Allow flower spikes to form and bloom fully — do not remove flower spikes from seed plants. 2. When most of a spike is brown and dry (while some may still be green), cut the spike. 3. Hang upside down in paper bags or rub dried spikes between hands over a bowl. 4. Winnow lightly. Seeds are very small. Label and store — basil seed viability: 3-5 years. |
| Cilantro (coriander) | 200-300 ft from other cilantro | When seed heads fully dry; green seeds turning brown and tan; seeds release easily when touched | 1. Allow plants to bolt and flower — select those that bolt LAST. 2. When seeds are changing from green to brown, cut entire plants or just seed heads. 3. Place upside down in paper bags in a dry location for 1-2 weeks. 4. Shake or rub to release seeds. Coriander seeds are actually fruit — two seeds fused together; can separate or leave as is. Excellent storage life: 5-7 years. |
| Dill | 200-400 ft from other dill AND from fennel (different species but some crossing risk) | When seed umbels are fully brown and seeds feel hard and dry; before they shatter | 1. Allow selected plants to flower and set seed fully. 2. Cut umbels when fully brown but before seeds drop. 3. Place in paper bags; shake to release seeds. 4. Screen or winnow to remove chaff. Dill self-sows prolifically — if seed heads are left, you will have dill permanently in that spot. Seed viability: 3-5 years. |
| Fennel | 500-1000 ft from other fennel AND be aware of dill proximity | When seed umbels fully brown; seeds hard and ribbed; aromatic when crushed | Allow to fully ripen; harvest umbels; dry in bags; shake to release. Fennel cross-pollinates enthusiastically and may affect fennel flavor and type if varieties mix. Florence fennel (bulbing) crosses with leaf fennel. |
| Chamomile (annual German) | 150-300 ft from other chamomile | When flower heads fully open and beginning to dry; centers turning brown and seeds forming in the dried receptacle | Rub dried flower heads between palms over a bowl; tiny seeds fall out with chaff; winnow lightly. Chamomile self-sows readily — allow some seed heads to drop in place for next year's plants. |
| Parsley | 150-300 ft (biennial — flowers second year) | Second-year plants; when seed umbels turn brown; seeds hard and ribbed | Biennial — overwinter selected plants or allow to self-sow naturally. Second year plants flower and set seed freely. Harvest umbels when turning brown; finish drying in bags; shake to release. Seed viability: 1-3 years (short-lived — use or share soon after harvest). |
Onion Family — Advanced Biennials
| Crop | Isolation Distance | Method | Notes |
|---|---|---|---|
| Onions | 1000-3000 ft (cross freely within Allium cepa; wind-pollinated) | Second-year bulbs replanted in spring; harvest when seed heads are black and beginning to shatter — typically mid-summer of Year 2 | 1. Autumn Year 1: dig best-shaped, medium-sized bulbs from selected plants. Store through winter in cool dry location. 2. Spring Year 2: replant stored bulbs in prepared bed. 3. Allow to flower and set seed — tall scapes with globe-shaped flower heads. 4. Harvest when 50%+ of seeds have turned black; cut entire head; dry in paper bags; shake to release tiny black seeds. 5. Onion seed has short viability (1-2 years) — use promptly. |
| Leeks | 1000-3000 ft (cross with other leeks and some Allium relatives) | Second-year plants; harvest when seed heads fully dry and black seeds visible | Leave selected leeks in ground through winter — they are very cold-hardy. Second spring they bolt and produce large globe flower heads. Harvest and process as onions. Select for thickness, upright habit, and blue-green color at autumn selection. |
| Garlic | No sexual reproduction — clonal propagation only | Harvest bulbs when tops begin to fall; select largest, best-formed bulbs for replanting | Garlic does not produce viable seed in most circumstances (and garlic scapes, though edible, do not produce seeds that breed true). Save seed garlic by setting aside the largest, healthiest, most characteristic cloves for replanting. This is vegetative propagation, not seed saving — but essential for maintaining garlic stock. |
| Chives | 150-300 ft from other chives | When seed heads fully dry; tiny black seeds visible in dried calyxes | Allow flower heads to dry fully; rub between palms; winnow lightly. Chives self-sow readily — a useful crop to let naturalize in a corner of the garden. |
Saving Seeds from Flowers
| Flower | Isolation Needed | When to Harvest | Method & Notes |
|---|---|---|---|
| Zinnias | 300-1000 ft between varieties (cross-pollinate by insects; colors will mix) | When flower heads are fully dry on the plant; centers brown; petals papery and dried; seed 'arrows' pull out cleanly | Pull or cut dried flower heads; crumble in hands over a bowl; each petal base contains a seed. Separate seeds from chaff by gentle blowing or fine screening. Save from colors truest to variety type. Zinnia seed viability: 3-5 years. |
| Sunflowers | 500-1500 ft between varieties (cross-pollinate by bees; cultivated varieties also cross with native sunflowers in some regions) | When flower head is fully dry, brown, and papery; seeds pull out easily by hand | Allow heads to dry completely on the plant; protect from birds with a paper bag secured over the head while drying. When fully dry, rub head over a container to release seeds. Giant-seed varieties thresh quickly; small-seed ornamental types may need rubbing. Sunflower seed viability: 4-6 years. |
| Marigolds (Tagetes) | 300-500 ft between varieties | When flower heads are fully dried and papery; seeds inside visible | Pull or cut dried flower heads; pinch from the base and pull the 'fingers' (seeds) out; each finger is one seed. Dry further if needed. Easy and productive — a single marigold plant produces hundreds of seeds. Seed viability: 2-4 years. |
| Cosmos | 300-500 ft between varieties | When seed needles are fully ripe — color changes from green to brown-tan; seeds release easily when touched | Seeds shatter readily when ripe — check plants often and harvest before they fall. Hold a paper bag under the seed heads and shake. Cosmos self-sows enthusiastically in mild climates. Seed viability: 3-5 years. |
| Nasturtiums | 25-50 ft (self-pollinating; some crossing) | Seeds form on the plant after petals fall; green seeds turn tan-beige and wrinkled when ripe; they drop readily | Harvest seeds when tan and slightly wrinkled — check under plants for dropped seeds. Dry on screen for 1-2 weeks. Large seeds easy to process. Nasturtium seed viability: 4-6 years. |
| Sweet Peas (Lathyrus odoratus) | 10-25 ft (largely self-pollinating) | Pods turn tan and papery; seeds rattle inside; harvest before pods shatter violently (they can fling seeds several feet) | Harvest when tan and papery; shell into a bowl away from wind (seeds can jump far). Dry seeds further for 1-2 weeks. Saving from sweetest-scented, truest-colored plants. Sweet pea seed viability: 3-5 years. |
| Calendula | 150-300 ft between varieties | When seed heads fully dry; curved seeds pull out cleanly from dried centers | Allow heads to dry on plant; harvest when brown and fully dry; seeds are large, curved, and distinctive. Process by rubbing between palms. Calendula self-sows freely — leave some heads to drop for natural regeneration. Seed viability: 3-5 years. |
| Bachelor's Button (Centaurea cyanus) | 300-500 ft between varieties | When flower heads fully dry and papery; seeds have feathery tips visible | Allow to dry on plant; pull or cut dried heads; rub between palms to release seeds. Bachelor's buttons self-sow prolifically. Seed viability: 3-5 years. |
| Hollyhocks (Alcea rosea) | 500-1000 ft between varieties (insect-pollinated biennial) | When seed packets on the central stalk are fully brown and dry; split open along the edge | Hollyhocks are biennials or short-lived perennials. Let seed packets dry on the stalk; harvest when brown and splitting; open by hand; seeds are flat, disk-like, and papery-winged. Very easy to process. Seed viability: 2-3 years. |
| Larkspur (Consolida spp.) | 150-300 ft between varieties | When seed pods turn tan and feel papery; seeds rattling inside | Harvest seed pods before they shatter; dry in paper bags; shake to release seeds. Larkspur self-sows freely in temperate zones — essential for maintaining naturalized plantings. Seed viability: 1-2 years (short-lived — save generously). |
| Echinacea / Coneflowers | 300-500 ft between species (different species cross) | When cone heads are fully dry, brown, and prickly; seeds visible in dried cone | Allow cones to dry completely on plant — birds also love them; protect or harvest promptly when ripe. Rub dried cones between gloved palms to release seeds. Seed viability: 2-3 years (use promptly for best germination). |
Section 4: Cleaning & Processing Seeds
Processing Harvested Seeds
Raw harvested seeds are almost always mixed with chaff, plant debris, empty seed casings, and in wet-processed crops, pulp and fermentation residue. Cleaning seeds thoroughly before storage is not just cosmetic — mixed debris increases moisture content, promotes mold, and can harbor fungal pathogens that reduce storage life and subsequent germination.
Dry Processing: Threshing and Winnowing
Dry processing is used for all seeds that ripen on dry pods, seed heads, or stalks — beans, peas, corn, carrots, lettuce, sunflowers, most flowers. The process has two stages: threshing (separating seeds from the plant material) and winnowing (using air to separate seeds from light chaff).
| Threshing Method | Best For and How To |
|---|---|
| Hand shelling | Large seeds (beans, peas, corn): shell by hand, pressing pods or cobs to release seeds. Satisfying and meditative for small batches. Scale up with pillow case method below. |
| Pillowcase method | Beans, peas, dried flower heads: place dried plant material in an old pillowcase; tie closed; lay on a hard floor; walk on it or beat against a wall or chair back for 30-60 seconds. Open and remove seeds. |
| Screen rubbing | Dried flower heads, umbels, small-seeded plants: rub dried seed heads between palms over a screen or bowl; seeds fall through or into the container while large debris stays in hand. |
| Flailing | Grain crops, some herbs: tie bundles of dried stalks together; beat against the inside of a large barrel or bin; seeds fall into the bottom. The oldest threshing method — still effective for medium-scale processing. |
| Rolling pin method | Flat-seeded crops, flower heads: place dried material in a cotton bag; roll firmly with a rolling pin; seeds released into the bag. Useful for delicate seeds that might be damaged by rougher methods. |
| Foot threshing on tarp | Large quantities of beans, peas, or grain: spread dried plant material on a clean tarp; walk over with clean-soled boots; gather seeds from the tarp surface. Highly efficient for larger quantities. |
Winnowing: Separating Seeds from Chaff
After threshing, seeds are mixed with chaff, empty pods, stem fragments, and insect debris. Winnowing uses air movement to separate the light chaff from the heavier seeds — a technique unchanged in 10,000 years of agriculture.
- •Set up outdoors or near an open window on a day with gentle air movement (not still, not windy).
- •Pour the seed-chaff mixture from one container to another from about 18-24 inches height. Light chaff blows away; heavier seeds fall into the lower container.
- •Repeat 3-5 times, gradually increasing the height for better separation.
- •For finer cleaning, use a series of screens with progressively finer mesh — seeds of uniform size fall through one mesh size while debris of different sizes is retained.
- •A fan on low setting held at the right angle can substitute for wind on a still day. Adjust angle and speed until chaff blows away but seeds fall straight.
- •Final hand-sorting: remove any remaining debris, discolored seeds, undersized seeds, or damaged seeds by hand. This step also allows visual assessment of seed quality.
Wet Processing: The Fermentation Method
Wet-fruited crops — primarily tomatoes, and optionally cucumbers and squash — benefit from a short fermentation step that mimics the natural decomposition process that would occur if a fruit were left on the ground. Fermentation breaks down the germination-inhibiting gel coat around tomato seeds, improves germination rates, and destroys some seed-borne pathogens.
- •Squeeze or scoop seeds and gel from fully ripe fruits into a glass jar. Add an approximately equal volume of water. Label the jar with the variety name.
- •Leave at room temperature (65-75°F ideal) for 2-4 days. Stir once or twice daily. A layer of white or gray mold will form on the surface — this is correct and expected. Do not be alarmed; this is the fermentation process at work.
- •After 2-4 days (do not go longer — over-fermented seeds can begin to germinate or be damaged), add a large volume of water and swirl vigorously.
- •Viable, fully developed seeds will sink to the bottom. Empty seeds, the fermentation layer, and debris will float. Pour off the floating material carefully — and with it any floating seeds, which are almost always non-viable.
- •Repeat the rinse process 3-5 times until the water runs clear and only clean seeds remain at the bottom.
- •Pour clean seeds into a fine mesh strainer; rinse under running water briefly.
- •Spread seeds in a single layer on a ceramic plate, glass surface, or silicone mat — NOT paper towels (seeds stick irreversibly when dry). Label the plate with the variety name immediately.
- •Dry at room temperature (not in a dehydrator or oven — heat above 95°F can kill seeds) for 7-14 days, stirring daily to prevent clumping. Seeds are fully dry when they snap or crumble cleanly and do not dent when pressed with a fingernail.
Testing Seed Viability Before Storage
Before committing your harvest to long-term storage — and certainly before growing season — a germination test tells you exactly how viable your seeds are. This prevents the frustration of planting trays of seeds that simply do not germinate.
- •Count out exactly 10 seeds of each variety (or 20 for greater accuracy).
- •Dampen a paper towel thoroughly; wring out so it is moist but not dripping.
- •Lay seeds on one half of the towel; fold the other half over them.
- •Place in a labeled zip-lock bag; leave partially open for air. Or place rolled moist paper towels in a labeled plastic bag.
- •Keep at the ideal germination temperature for that crop (typically 65-75°F; check crop-specific requirements). For quick-germinating crops (radish, cucumber): 3-5 days. For slow crops (parsley, parsnip): up to 14 days.
- •Count germinated seeds at the appropriate interval. Germination rate = (germinated seeds / total seeds) x 100.
| Germination Rate | What to Do |
|---|---|
| 90-100% | Excellent seed — store as is; sow at standard spacing in the garden |
| 75-89% | Good seed — slight reduction in vigor possible; consider sowing at slightly higher density as insurance |
| 50-74% | Acceptable seed — worth using but sow at 1.5-2x normal density to achieve adequate plant numbers; replace with fresh seed when possible |
| Below 50% | Poor seed — germination unreliable; either sow very densely or obtain fresh seed; investigate storage conditions |
| Below 25% | Seed has failed — do not plant; investigate what went wrong in processing or storage; obtain fresh seed |
Section 5: Storing Seeds for Maximum Viability
Storing Seeds: Keeping Genetics Alive for Years
A seed is a living organism in a state of suspended animation. Its metabolism has slowed to near-zero, but the embryo inside is alive and capable of germination when conditions are right — whether that is next spring or fifteen years from now, depending on how the seed is stored. The science of seed storage is the science of controlling the two factors that drive seed deterioration: temperature and moisture.
The Two Enemies of Seed Longevity
- •Heat: Every 10°F (5-6°C) increase in temperature roughly halves seed storage life.
- •Moisture: Seeds stored at high humidity absorb water, resume metabolism, and either germinate prematurely or rot. High moisture is the fastest way to kill a seed collection.
Recommended Storage Conditions
- •Ideal: 40-50°F (4-10°C) and 20-40% relative humidity. A refrigerator (not freezer) in a sealed container with desiccant is excellent for most home seed savers.
- •Containers: Paper envelopes inside airtight glass jars, metal tins, or heavy zip-lock bags with desiccant packets. Never store long-term in plastic bags alone (moisture buildup).
- •Desiccant: Silica gel packets (from new shoes, vitamin bottles, or purchased) dramatically extend storage life by keeping humidity low inside the container.
- •Labeling: Every envelope must have the variety name and the year collected. Do not trust memory across the winter.
Expected Seed Longevity Under Good Conditions
| Crop | Expected Viability (good storage) |
|---|---|
| Tomatoes, cucumbers, melons | 10+ years |
| Beans, peas, corn, sunflower, zinnia, nasturtium | 4-6 years |
| Lettuce, basil, marigold, cosmos, calendula | 3-5 years |
| Onions, leeks, parsley, parsnip, larkspur | 1-3 years (short-lived — use or share promptly) |
| Most other vegetables and flowers | 3-6 years |
The silica gel packet from new shoes or vitamin bottles is your friend. Add one to each seed jar. It can be re-dried in a low oven (250°F for 2 hours) when it turns pink (if it has indicator) or feels damp.
Closing Reflection
Seed saving is not just a money-saving technique or a hobby. It is a direct connection to the 10,000-year human story of agriculture. Every time you save seed from a plant that performed exceptionally well in your garden, you are participating in the same ancient conversation between people and plants that created every variety we grow today.
Start small. Pick one easy crop this season — tomatoes or beans — and save seed from your three best plants. Dry them carefully. Store them well. Plant them next year. Watch what happens over three seasons. The plants will tell you if you are doing it right. The results, season after season, compound in ways that buying new seed every year never can: a garden that is truly your own, tuned to your conditions, your taste, and your climate.
The best seed you will ever grow is the seed you save yourself, from the plants that already proved they belong in your garden. The best time to start was last season. The second best time is now.
🌿 Get Seasonal Gardening Tips
New guides, planting reminders, and growing tips — straight to your inbox.
No spam. Unsubscribe anytime.
About the Author
David Rodgers is the Founder & Head Gardener of Planting Atlas. With over 40 years of hands-on gardening experience in Oklahoma's Zone 7 climate, he researches, writes, and personally tests every guide on the site.
David draws from real backyard trials, soil testing, and trusted sources like Oklahoma State University Extension and USDA data to deliver practical, zone-specific advice that actually works.
Read more about David and Planting Atlas →